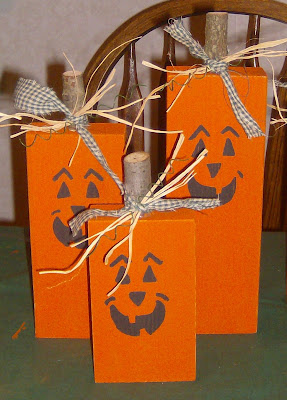
Finally! My post on our "Mom's Craft Night Out!"
As you can see, we made pumpkins! It was not my original idea. I found the idea on "It's a Daisy Day!" website and put my own little twist on it. As you can see, she made fall pumpkins for her craft. We did too but we painted both sides and added jack-o-lantern faces on one side. When Halloween is over, all we have to do is twist the ribbon, raffia and wire around that's on the stem and we've extended our decor through Thanksgiving! Gotta love a dual purpose pumpkin!
 See. Here's the other side!
  Okay. I get caught up in the night and forget to take pictures of everything but here are some pics from the night with the directions thrown in!
First we painted all the sides of the pumpkins except the bottom with craft paint. These pictures show really orange pumpkins but they aren't that orange. They look more like the first two pics. We used 2 X 4's for the pumpkins and they are cut in 6", 8" and 10" lengths. Thanks Curtis for cutting them...we all appreciate it!
 Hanging out while we wait for them to dry. Usually at this time we are snacking on the treats our Snack Hostesses bring but we did that before we even started. We had some catching up to do since our group had the summer off from crafting.
 Applying a second coat.

 After the two coats of orange were dry, we painted the faces on them. This was a stressful time for some of the Moms but they ALL turned out so cute!
 Once all the paint was completely dry, we took sandpaper to all the edges of the blocks. We also did a light sanding over the front and the back (right over the faces) to distress them a little.
 We took floral wire and wrapped it around a pencil to make the curly part of a pumpkin vine. We then stretched to spring to elongate it and make it look not so uniform.
 Okay, here's where I stopped taking pictures so there are no visual aids for the next steps. Anyway, they are really easy and I'm sure you can figure it out!
We hot glued (with a big old glob of hot glue) the 2" natural wood stems on top of the blocks. They are about a nickel size in diameter. Curtis found us some awesome branches on the ground (so no trees were harmed in the process...this makes my "green" daughter very happy) in the woods at his parents' house and cut them for us.
After the hot glue was set, we tied a piece of torn fabric, 5-6 strands of raffia and the curly wire onto the stem and ta da! We have pumpkins!
Here we all are with our pumpkins! Thanks Stephanie (Susan C.'s) daughter for taking our pics! Left to right are: Kelly, Susan C., Dawn, Sherie, Nettie, Sandy, Me (Cindi) and Susan D..
 A little artsy shot from Steph...she wanted to highlight the pumpkins but I think she highlighted my double chin! Thanks Steph!
 Here are our final projects. I think I missed taking pics of some but aren't the ones I did get sweet?
Have Fun!
Pin It


2 comments:
This looks SO much fun!! I absolutely love the faces and the flip idea of making them both a Halloween and Thanksgiving decoration. I'm so glad you liked this idea and thank you so much for letting me know that you enjoyed making these, it made my day! I hope you and your friends enjoy them for years!
Daisy
Wow? I have to tell you-- I will be copying this!! So cute! I love that you can turn it around for post-halloween. I won't forget to tell people I found this idea from your blog! ;) have a great weekend!
Post a Comment